(A quick note before we get started: I wrote this rather lengthy (spoiler alert!) post almost entirely using the device I am writing about here, using StackEdit, a really useful online Markdown editor with an even handier Chrome extension. Because StackEdit can sync MD documents with Google Drive and (even better for me) Dropbox, I can also edit them with Byword on my iPhone, which has Dropbox sync as well. Furthermore, both apps can publish MD documents to services such as Blogger, Medium and WordPress… which is how this got online 🙂 )
Recently, thanks to an Amazon gift card from Christmas and a pretty good Amazon Warehouse deal, I was able to “land” a gadget I’ve been keeping an eye on ever since Google announced it as a “reference design” in 2015.

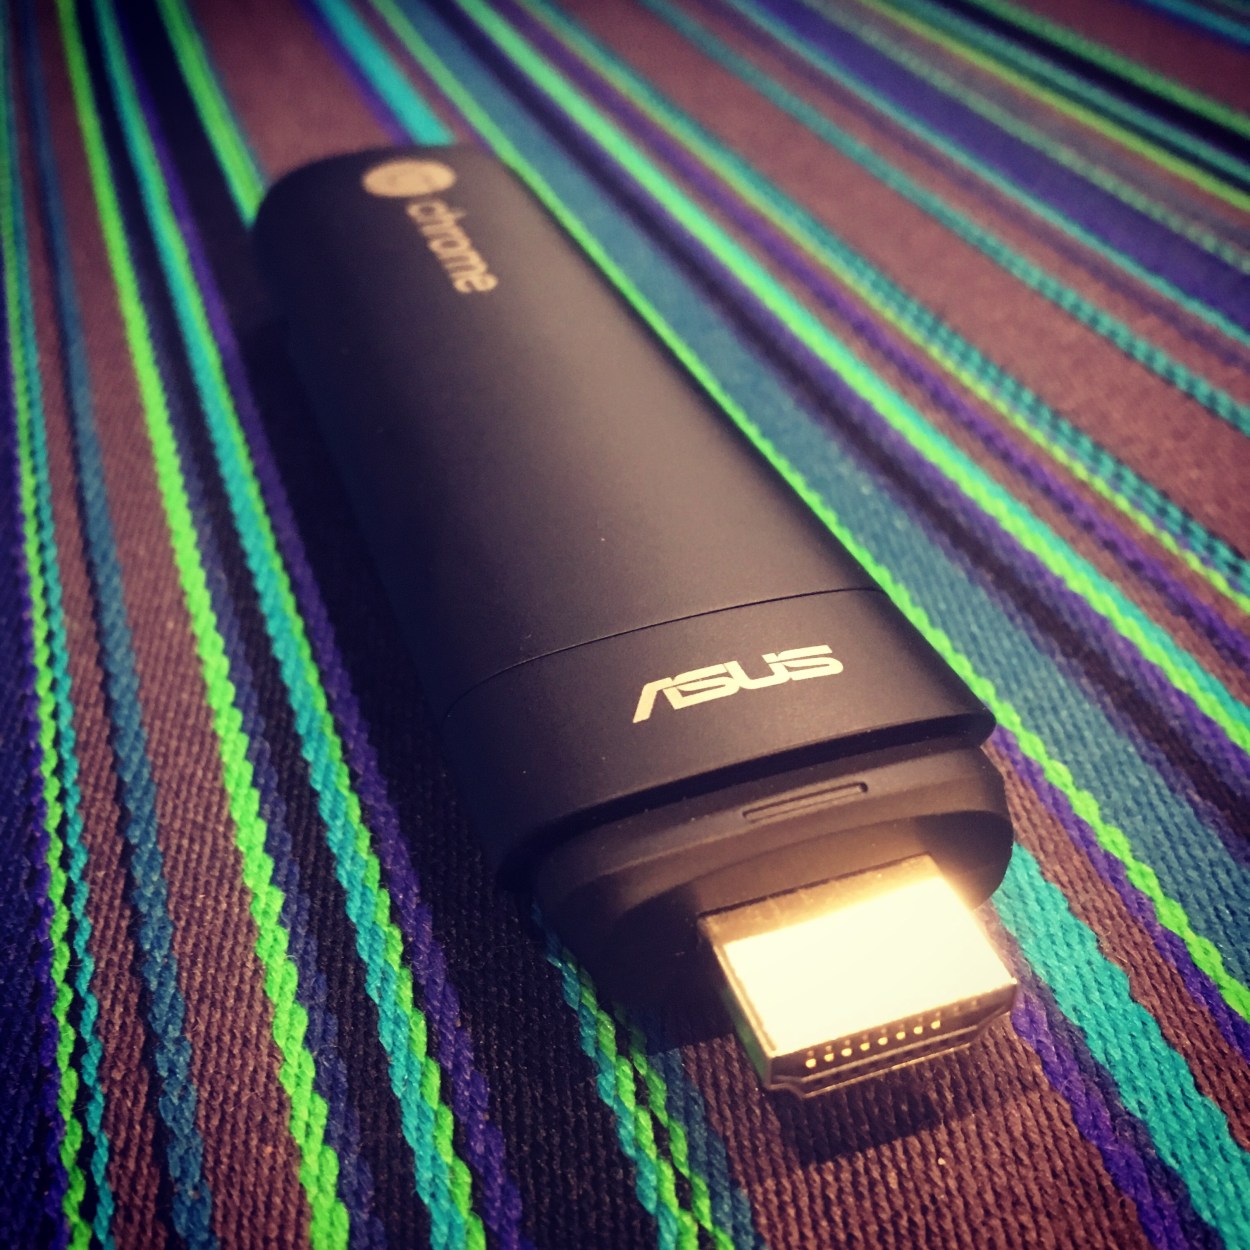
The Asus Chromebit CS10, on the face of it, is an example of the “stick PCs” which have appeared over the last couple of years (possibly the best-known being Intel’s Compute Stick). Unlike most of these devices, which usually run either Android, or some flavour of Linux or Windows, the Chromebit (of which Asus’ CS10 is to date the only example of the “reference design” to go on sale) runs Google’s Chrome OS, which until now has powered Chromebooks (usually low-cost laptops) and Chromeboxes (small “set-top box”-type computers).
The Asus Chromebit CS10 looks like an oversized USB flash drive (with an HDMI connector on one end instead of USB). It has a power socket for a proprietary mains adapter, and a USB port on the opposite end to the HDMI plug. The CS10 is powered by a Rockchip quad-core RK3288C processor (as you might find in a more affordable Android tablet), and offers 802.11 a/b/g/n/ac WiFi and Bluetooth V4.0, as well as 2GB RAM and 16GB onboard storage. The storage isn’t expandable by memory cards (although it can access USB mass-storage connected to the device), but Chrome OS is designed to make use of “cloud” storage. (It is primarily focused on Google Drive, but as we’ll see, other services can be accessed.) As part of my purchase of the CS10, I got a two-year 100GB boost to my Google Drive account with the CS10. (It costs less than £2 per month after that, but I imagine I’ll go with that…)
I’ve been interested in Chrome OS for some time, as my family and I make quite a bit of use of Google services, and I figured I could use a Chrome OS computer quite happily as a “backup” machine, such as when our Mac is needed for more specialist tasks (e.g. music-production). Finally, recently I was able to “make a move” on a Chromebit, and between the Amazon gift card and Warehouse offer, I got the chance to turn our lounge TV into a secondary PC, for little over £60…
First steps
My expectations of the Chromebit were fairly modest, partly due to the cost, but also by having read most of the available reviews. Whilst generally positive, there was a common thread of “don’t push the thing too hard, or it struggles”. Personally, I’m not normally the type to have lots of browser tabs open (and by that I mean 20+, rather than three or four). Moreover, as we also have a Roku 2 plugged into the TV for video-streaming duties, I foresaw the Chromebit being spared “heavy” use, in favour of Web-browsing, emailing and other “light PC”-type tasks. I was also hopeful that the Chromebit might be able to act as a remote-access terminal (VNC, SSH, Citrix and the like), as for some reason our Mac has problems accessing certain systems this way.
Installation of the Chromebit was pretty painless. I connected the CS10’s power adapter (apparently, the prototype had a USB power connection, which would’ve been more convenient in some ways, but the device’s power needs apparently exceeded what USB could provide), and plugged into a spare HDMI port on the TV via the included HDMI extender cable. As I don’t have a Bluetooth keyboard/trackpad, but own a Logitech K400 2.4GHz wireless one, I plugged the K400’s “nano receiver” into the single USB port on the Chromebit. (Next accessory to buy: a USB hub with integrated Ethernet adapter.)
Power on… and the TV showed a white screen with a small “Chrome” logo. Less than five seconds later: we were at the setup screen. (I’ll jump the gun here, and say I am extremely impressed by how quickly the Chromebit boots from a cold start. Usually, I can log in within ten seconds of switching it on, which even my iPhone can’t quite match.) Slight oddity: the default language on first activation is Dutch, but to amend this I simply had to pass through to the next screen, where I could change the language as needed.
A couple of settings later (including the details for my wireless network of choice), and it was time to log into my Google account. (In passing: I read somewhere that the first account logged into on a Chrome OS device, becomes the “master” account for that machine. If you have a Chromebook, Chromebox, etc. which will be used by multiple accounts, you might want to bear this in mind.) One username, password and two-factor authentication code later, and I landed on a nicely-minimalist desktop, with a familiar-looking “taskbar” (or “shelf”, in Chrome OS terminology).
Within a couple of minutes, the extensions, apps, bookmarks and other settings from my Google account and Chrome setup, had all been imported and made available. I had to sign into a few Web services, but nothing too onerous; within ten minutes of switching on the Chromebit, I was basically up and running. (Did I mention I’d quite like a Chromebook now? 😉 )
I’m not going to write a guided tour of Chrome OS, as there are some really good sites out there which have done the job for me in that department. However, there are a few items that I have found useful already…
Hints and tips
The “Windows” key
Chrome OS has no shortage of useful keyboard shortcuts already set up (e.g. Win + L locks your screen; Alt + Shift + M opens the Files (file manager) app; etc.), but I found myself wondering if the Windows key on the K400 would go to waste. I shouldn’t have worried: some thoughtful soul at Google has mapped it to do the same job as the “Search” key on a Chromebook. That is, it pops up a Google search box, with access to the apps you have installed, and Google Now “cards” if you’ve enabled them. Good thinking, Google.
Adding other network/cloud storage to Files
The Files app is a decently-functional file-manager like Windows Explorer, which “out of the box” gives you access to your Google Drive, plus locally-stored files and any directly-connected mass storage devices (USB flash drives, hard disks, etc.).
However, you can also add a number of other cloud-storage providers’ services to Files, thanks to the “Add new services” option in the left-hand column. I have used this to add my Dropbox account, as well as our Synology NAS box (via the WebDAV service).
Take a screenshot
On a Chromebook (which, you may remember, has a keyboard layout with some differences to a “usual” PC one), you take a screenshot by pressing Ctrl + “window-switcher” (i.e. one of the Chrome OS top-row keys). So… what do you do on a Chromebit (or Chromebox) with a PC keyboard?
The answer, according to this article on Chrome Crunch, is delightfully simple: use the “Print Screen” key! On my Logitech K400 (which lacks a dedicated key for this), that’s Fn + Insert, and I can confirm it works fine for me. The captured image is placed in the “Downloads” folder, which, incidentally, isn’t backed up anywhere and will be emptied if you do a “Powerwash” (factory reset). As a result, I’d move the screenshot to (say) a folder in your Google Drive (or Google Photos) if you want to keep it.
Local printing
Ever since Chromebooks emerged a few years ago, one of the most common “gripes” along the way, has been the lack of any support for “local” printing—that is, with either directly-connected (USB) or network printers.
Historically, the only printing option with Chrome OS has been via Google Cloud Print, which involves sending your print jobs to Google, which then relays them onto your GCP-connected printer. GCP has its benefits, but concerns over security, privacy and reliability have never gone away, even for Chromebook fans.
Earlier this month, I found Chrome Unboxed’s article from December 2016, reporting that Chrome OS’ “Canary” (developer) channel had added local printing support, via the Common UNIX Printing System (CUPS) found in most Linux distributions.
I can update the Chrome Unboxed article in one respect: as of late February 2017, CUPS support has been added to the “stable” Chrome OS channel (i.e. you don’t have to switch to the unstable “Canary” channel to get it).
To find this option (and they make you look for it), in the Omnibar type
chrome://flags/and scroll about three-quarters of the way down the page (or Ctrl + F and enter “Native CUPS”). Select “Enable” for this option and restart; you should then find a new “Printers” option on the Chrome OS Settings page. (If you’re viewing this on a Chrome OS device, you can try using this link to go directly to your new Printers page.)
I have yet to test this feature with the Chromebit, due mostly to the fact we are currently without a suitable printer to try it with, but as soon as I can give the feature a spin, I will report back here. Assuming it works as “trailed”, this is a major upgrade for Chrome OS devices, which in my view should be announced more prominently than it has been.
And speaking of major updates…
Android apps?
In May 2016, Google made a pretty momentous announcement: selected Chrome OS devices would, over time, be given the ability to install and run Android apps from the Google Play store. The impression I got from early coverage, was that this would only apply to newer and more “premium” machines, such as the Chromebook Pixel.
Not so, it seems… this list of Chrome OS devices due to receive the Android capability at “some time during 2017”, includes the Asus Chromebit CS10. Of course, some Android apps might have memory/CPU requirements beyond what the Chromebit can provide, but if even some of them will run acceptably, that should really extend the capabilities of this surprisingly capable little device.
Downsides to the Chromebit
You might get the idea that I’m rather pleased with the CS10, and you wouldn’t be mistaken in that… but surely there must be at least one or two “gripes” to liven things up here?
Well, yes, but they’re relatively minor, at least to date. One is that the Chromebit runs quite hot, especially if you do more than basic email, writing documents and so on. It hasn’t got to the point where I am concerned for its safety (or that of anything in the immediate area), but I’d say you wouldn’t want to be holding the device for very long.
Plenty of reviews have said how it doesn’t take long before the 2GB RAM in the Chromebit fills up during use, and the device slows down. I haven’t really noticed this when using the CS10, but then I don’t tend to be the kind of computer user who has tons of tabs open while also watching 1080p HD video on YouTube. For modest use (and situations where the heavy-lifting isn’t being done on the Chromebit), Asus’ Chrome OS stick works well, especially given its size and price.
Summing up, and going forward
Yep: I’m really fond of the Chromebit. In all honesty, at the price I got it for (barely twice as much as a Chromecast would have set me back), my expectations were modest, but I have been really impressed by what this chocolate bar-sized device is capable of. For average Web-browsing, emailing, document-writing, remote access and other non-supercomputing-type applications, the Chromebit is more than adequate, and that’s all I need it to be.
There are a couple of extra add-ons I’d like to try with the Chromebit. Firstly, I want to add a combo USB hub with integrated gigabit Ethernet adapter. This would expand the USB ports available from one to three, and also allow me to make use of a wired network connection. (I have read that the Chromebit might not be able to power such a device enough for it to work, in which case I would probably dust off my unused Belkin 7-port powered hub and go for a dedicated USB Ethernet adapter instead.)
In the meantime, at the end of this article… I’d give a qualified thumbs-up to the Asus Chromebit CS10. For what I want it for, it was definitely a worthwhile acquisition, and I look forward to further adventures with it—hopefully including local printing and Android app support!

I hope you continue to enjoy your Chromebit and never have to perform a procedure to recover from the dreaded but very common ” chrome OS is missing or damaged. Please insert a recovery USB stick “. Very very frustrating and time killing.
Yes, I hope that doesn’t happen to me either :-O
Hi Rick – I haven’t seen any news on when the Chromebit CS10 will be getting Android app support, and I’ve been keeping an eye out for this. To be honest, I was surprised when I saw the CS10 was on the list in the first place – I don’t know if the Chromebit will get Android app support in the end, but I’ll update this post if I hear of it. Many thanks!
Tim
Thanks for the kindness.